Light Tracer Render 3.2.0
We are pleased to announce the new version of Light Tracer Render 3.2!
This release is primarily designed for jewelry designers, introducing support for custom HDRI maps for stones and metal frames. But we didn’t stop there! Recognizing its broader potential, we developed a versatile image composition mechanism that adapts to any use case—giving product designers and 3D artists unparalleled control over how individual objects are rendered.
We invite you to learn more about the release's features in the following sections.
Rendering layers
The new version introduces Rendering layers—a powerful feature that allows you to assemble the final image from multiple independently rendered image layers. Think of it like working with layers in image-editing software, but with full 3D control. Light Tracer will do everything automatically: sequentially render each layer and then blend them properly to obtain the final image. How it works:

Model by Wire Wheels Club
Imagine rendering a diamond with one HDRI map for dazzling brilliance, while the metal frame uses another for optimal reflections. With render layers, you can fine-tune each element separately, then blend them seamlessly for a flawless result. Now let's take a look under the hood and learn how to do it.
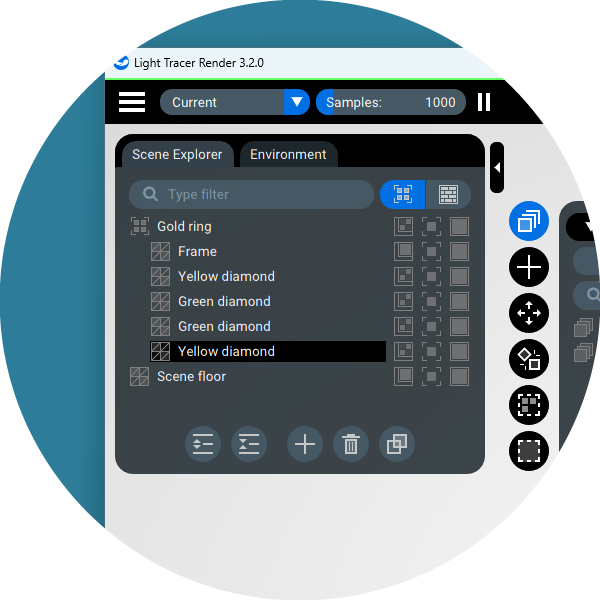
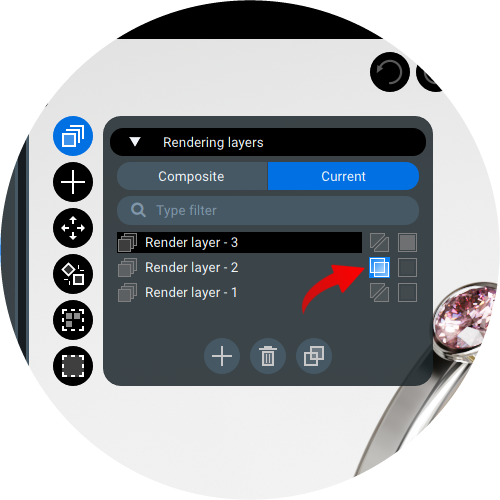
Layer management is available in a separate new widget, which opens via the top-left button:
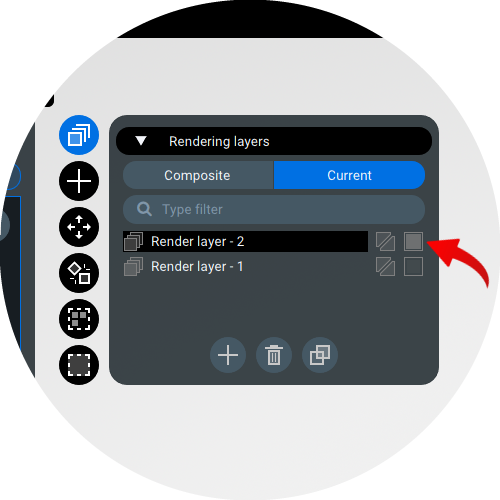
Using the familiar buttons at the bottom, you can Add a new layer, Clone an existing one, or Delete one or more layers. If there are many layers, you can use the Search filter to quickly find the ones you need. For typical tasks—such as rendering diamonds with a separate HDRI map—two layers are usually sufficient, as shown in the screenshot.
Note that at any time only one layer can be selected as the current (active) one. The current layer is marked by a filled box icon (shown by the red arrow), while inactive layers display an empty box icon. You can make a layer current by clicking this icon or by double-clicking the layer itself.
The workflow is simple. Make the first layer current and cut out everything except the diamonds (as shown in the screenshot above). Next, make the second layer current and cut out only the diamonds. This way, you’ll separate the scene into two distinct layers.
Now it's just a small matter. Make the layer with the diamonds current and choose the desired HDRI map (or even create one in the built-in HDRI editor!). For optimal results, use a bright, high-contrast HDRI to maximize diamond sparkle. Then, switch to the layer with everything else and select another map. For metal components, use a softer, diffused lighting setup. That's all there is to it!
To preview how your layers combine, switch to Composite mode at the top of the Layer widget. In this mode, Light Tracer will render each layer sequentially, and blend them into the final composite image.
Note: Composite mode is automatically disabled when you edit the scene, as it's designed for previewing rather than editing!
Once you are satisfied with the result, use the refreshed export buttons on the top toolbar:
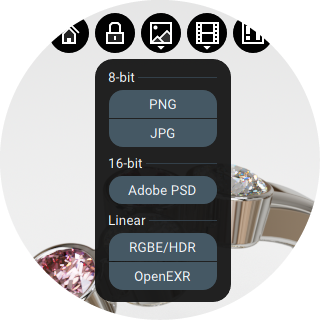
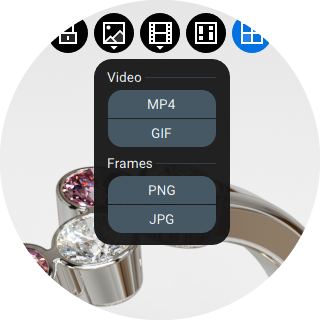
Here, you can save the final still image or export composited video (for animated scenes). This covers everything you need to know about using layers. However, we'll explain some more advanced techniques separately below, which may be important for complex use cases beyond typical scenarios.
Advanced use cases
Blending modes
First, let's discuss layer blending modes. For your convenience, Light Tracer supports two blending modes: "Disjoint-over" and the standard "Over". These modes handle partially transparent, overlapping areas differently.
While "Over" simply adds the color and alpha of the foreground to the background, "Disjoint-over" assumes these areas don't overlap and calculates the blend based on that assumption, often preventing issues with undesired edges around cutted objects. Since "Disjoint-over" works best for our main use cases, it's set as the default. However, you can switch to standard "Over" blending anytime using this button in the Layer widget:
What does the layer store?
Let’s explore what each layer actually preserves. While you’re already aware that layers keep object visibility states and HDRI maps, they actually store the complete environment configuration from the Environment tab. This includes the HDRI, its brightness and rotation settings, environment light configurations, and all other related parameters. Additionally, you can create entirely distinct environments for different layers—not just different HDRIs, but completely separate environment types (whether Plain, HDRI map, or Sky) with customized light sources.
Consider our diamond ring visualization scenario as an example. As an alternative approach, you could apply the same soft lighting map to both the diamonds and metal frame layers, while exclusively activating several small, bright light sources in the diamonds layer to create that distinctive gemstone sparkle. This demonstrates the sophisticated lighting control that layers enable for specialized scenarios.
How does this work with animation?
If you've previously used Light Tracer's animation capabilities, you might be wondering how layers interact with this feature. When animating a scene or environment, the created keyframes store not just object movements but also visibility settings for objects and light sources, along with all environment parameters.
Key consideration: The keyframes are shared across all layers. However, while working within a specific layer, you can capture settings that apply exclusively to that layer, including object visibility and the configuration of the environment and its light sources.
For example, if you hide an object in one layer, it remains visible in others. This functionality enables powerful animation possibilities. You could create entirely different animated environments for different elements—perhaps one set of moving light sources for the diamonds and another for the metal frame. There are two primary ways to achieve this: either by assigning different motion paths to the same sources in different layers, or by creating completely separate sets of light sources and hiding the appropriate set in each layer.
This layered approach opens up significant creative potential. We encourage you to experiment with these capabilities, and please share your feedback! Based on user experiences, we'll continue refining this system to make the most useful workflows even more intuitive in future updates.
Improved scene control
Scene Explorer has been enhanced for better usability:
Visibility Control Improvements
The object and material tabs now feature unified visibility toggles for:
| Icon | Description |
|---|---|
 / /

|
Enable/disable holdout mode for the object in the active rendering layer |
 / /

|
Show/hide the object in the viewport while keeping indirect lighting from it |
 / /

|
Show/hide the object in the scene completely |
Keyboard Shortcuts
Remember these handy shortcuts for efficient workflow:
| Shortcut | Description |
|---|---|
| Ctrl + A | Select all scene objects (at the same hierarchy level) |
| Ctrl + Click | Select multiple scene objects |
| Shift + Click | Select a range of scene objects (at the same hierarchy level) |
Streamlined Interface
We have streamlined typical scenarios by relocating two elements to more intuitive locations. The list of environment lights has been moved to the Environment tab:
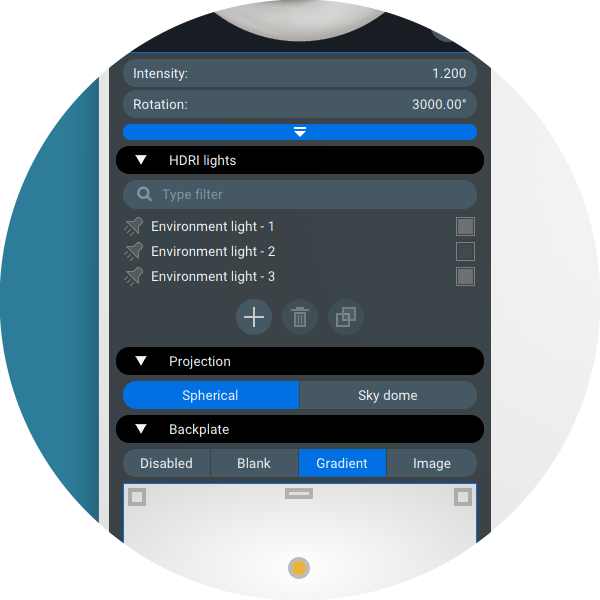
Now when setting up custom studio lighting, everything you need is right at your fingertips: create new lights, easily select them, and toggle their visibility—all without tab switching.
The list of view slots is now located in the Camera widget:
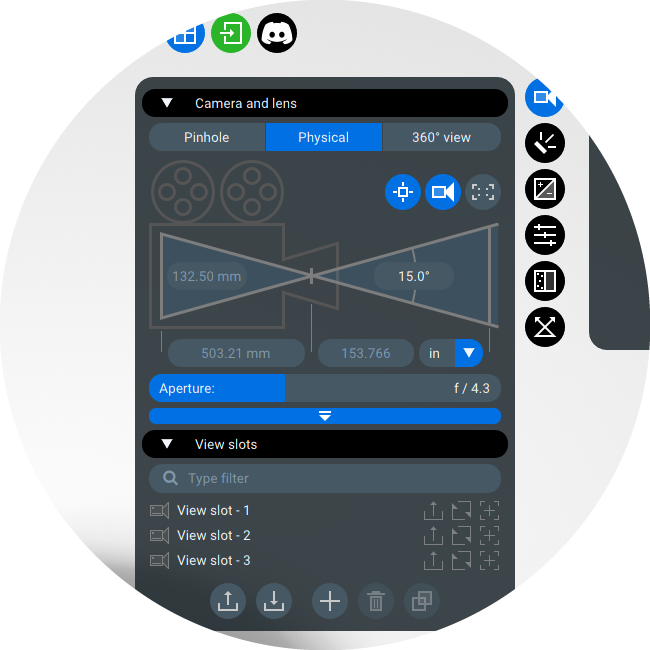
This reorganization provides better workflow ergonomics while keeping all functionality easily accessible.
Improved productivity
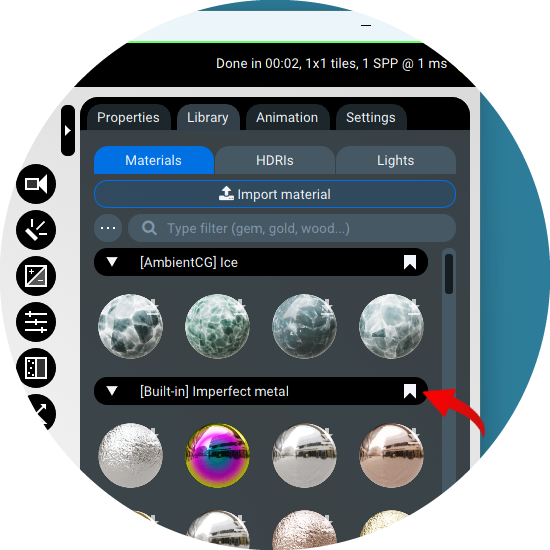
Pinned material categories
If you frequently use certain material categories, you can now pin them to keep them at the top of the Library. Simply click the bookmark icon next to the category name to pin it, and click again to unpin:
Undo/redo for HDRI
While implementing the layer system, we developed an efficient storage solution for multiple environment maps. This work brought an additional benefit: full undo/redo functionality for environment maps! Now you can try different maps to find perfect lighting for your product, then easily revert to previous versions using either the corresponding toolbar buttons or the standard Ctrl + ‘Z’ shortcut.
Refreshed HDRI editor
The new version introduces an enhanced HDRI editor with a larger workspace and improved light manipulation. Two new buttons now appear above the chrome ball:
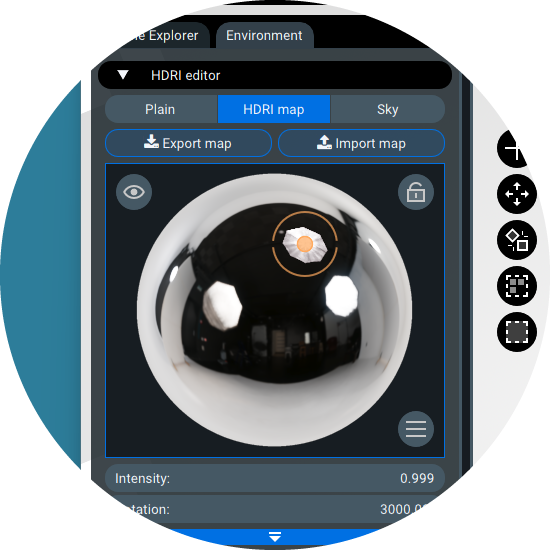
Left button (eye icon): Hides all light sources from camera view while the lighting from them will remain. You can use it when sources appear in-frame and create unwanted highlights.
Right button (lock icon): Toggles a new mode where light sources rotate with the environment map (i.e., remaining locked relative to it). When off, light sources maintain their positions during map rotation (original behavior). Based on user feedback about workflow limitations, we've implemented both options to accommodate different working styles!
Rendering in minimized state
Finally, we've implemented another useful improvement: Light Tracer now continues rendering when minimized. Previously, rendering would either slow down significantly or stop completely. Now you can set up your scene, start rendering, and minimize the window to work on other tasks without interruption.
Looking ahead
The new Light Tracer Render update is designed to help you create high-quality images more efficiently. With the new streamlined layer workflow, you can achieve great results with less effort.
We love hearing from you! Your feedback fuels our improvements, so keep sharing your thoughts. And if you ever need support or just want to connect with fellow artists, our friendly Discord community is always ready to chat.
Happy creating—let’s make something amazing together!