Light Tracer Render 3.4
We're pleased to announce the release of Light Tracer Render 3.4.0 – a significant update that offers a fresh perspective on the 3D designer's workflow and dramatically improves everyday usability.
A key highlight is the introduction of Light Space (https://space.lighttracer.org) – a new cloud platform that lets you upload your projects, access them from any device, collaborate with your team and clients, and embed interactive 3D showcases directly into your websites and online stores.
Light Tracer Render itself is packed with new features, including:
- UI/UX refinements – redesigned color pickers (significantly more intuitive!), improved scene structure editing, hot reloading of textures, an updated asset library, and plenty more.
- Powerful new tools – faster and more accurate UV unwrapping, improved Bi-directional mode that converges much faster, orthographic camera support (perfect for architectural and interior visualization), and a new Rhino importer that loads 3DM files even without pre-stored tessellation.
- Light Space publishing – seamlessly share your projects online.
Below, we invite you to explore all the new features in greater detail.
Try Light Tracer Render free for 14 days
Get full access to create photorealistic renders of your jewelry and products. No credit card. No watermarks. Just sign up with your email.
1. Light Space – Cloud Platform for Designers
Light Space is a secure 3D showcase platform built for designers. Upload your projects with ease, share them with colleagues, clients, or friends, gather feedback, and embed interactive 3D views into your website – all while keeping your models fully protected. No more emailing heavy files or confusing version trails! Everything lives in one place, accessible from any device.
Let's walk through the main use cases to get you started quickly and effortlessly.
1.1. What’s included
Storage & access
Light Space provides Light Tracer users with 2 GB of free cloud storage. Upload your projects and access them from any device – no more manual file transfers or version headaches. If you exceed the 2 GB limit, uploading new projects may be temporarily limited. No additional fees will apply – we'll never surprise you with unexpected charges.
Security first
Your models are encrypted before uploading. Only you, as the author, have access to the original project for editing. All shared links – including embeds on third-party websites – transmit models in encrypted form and are for viewing and showcase purposes only.
Seamless integration
Light Space uses your existing Light Tracer account – no separate registration required. It works on all modern browsers, including Chrome, Safari, Edge, and Opera, and is compatible with Windows, Linux, macOS, iOS, and Android devices.
System requirements
Light Viewer – the web-based 3D viewer used to preview and interact with your projects in Light Space – requires a browser that supports the modern WebGPU standard, which is already available on a wide range of devices. For the best performance, please keep your video drivers, browser, and system (including macOS/iOS) updated to the latest versions.
1.2. Uploading to Light Space
Projects can be uploaded directly from Light Tracer Render using the new Upload button in the top toolbar. Clicking it opens the Uploading popup, where you can start uploading your current scene by clicking Sync now:
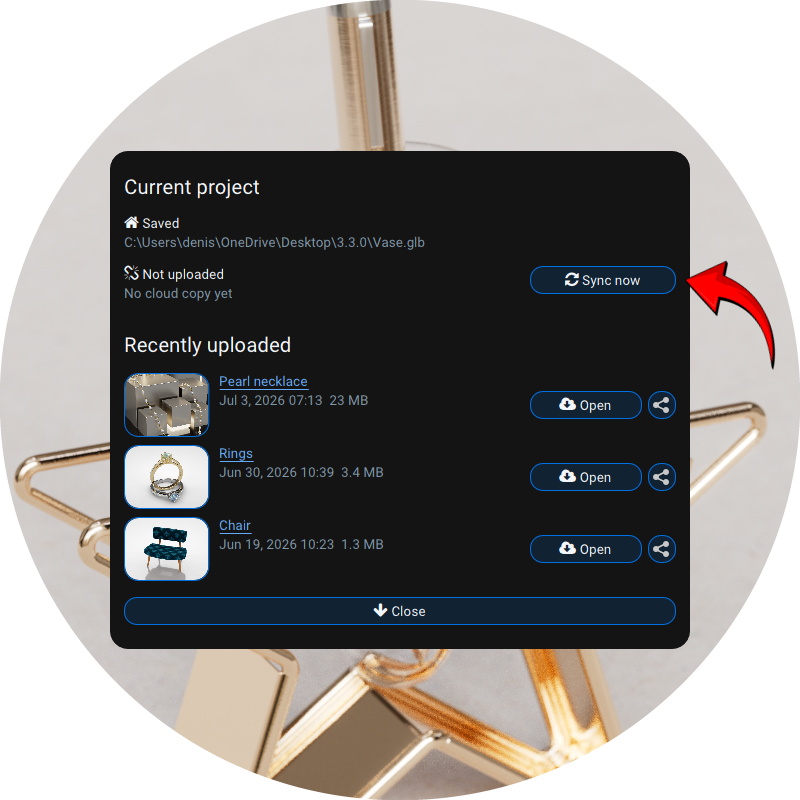
The scene is saved in its current state, then uploaded to the cloud. You don't need to wait for the upload to finish – feel free to close the window and continue editing while the process runs in the background.
The Uploading popup also shows your Recently uploaded scenes, with quick actions available for each:
- Open – downloads the project from the cloud to your local machine and opens it for editing.
- Share (
 ) – generates a view-only link and copies it to the clipboard, so you can easily share your 3D project with colleagues or clients and gather feedback.
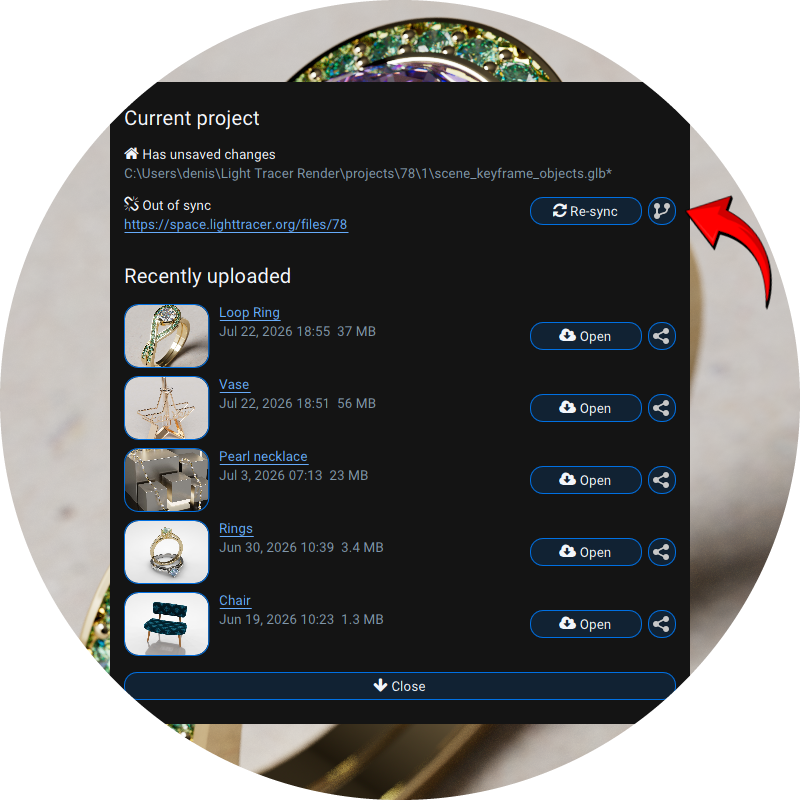
If you've opened a project from the cloud and made changes, two additional options appear:
- Fork (
 ) – creates a separate variant from your current project. The original cloud version remains intact, and the new fork can be edited and uploaded independently.
 - Re-sync – overwrites the cloud version with your current local changes.
This gives you full control over versioning and collaboration, whether you're iterating on a design or sharing a final concept with a client.
1.3. Cloud project setup
When you open Light Space (https://space.lighttracer.org), you'll see a clean main page listing all your projects. Each project appears as a card with a preview thumbnail and name:
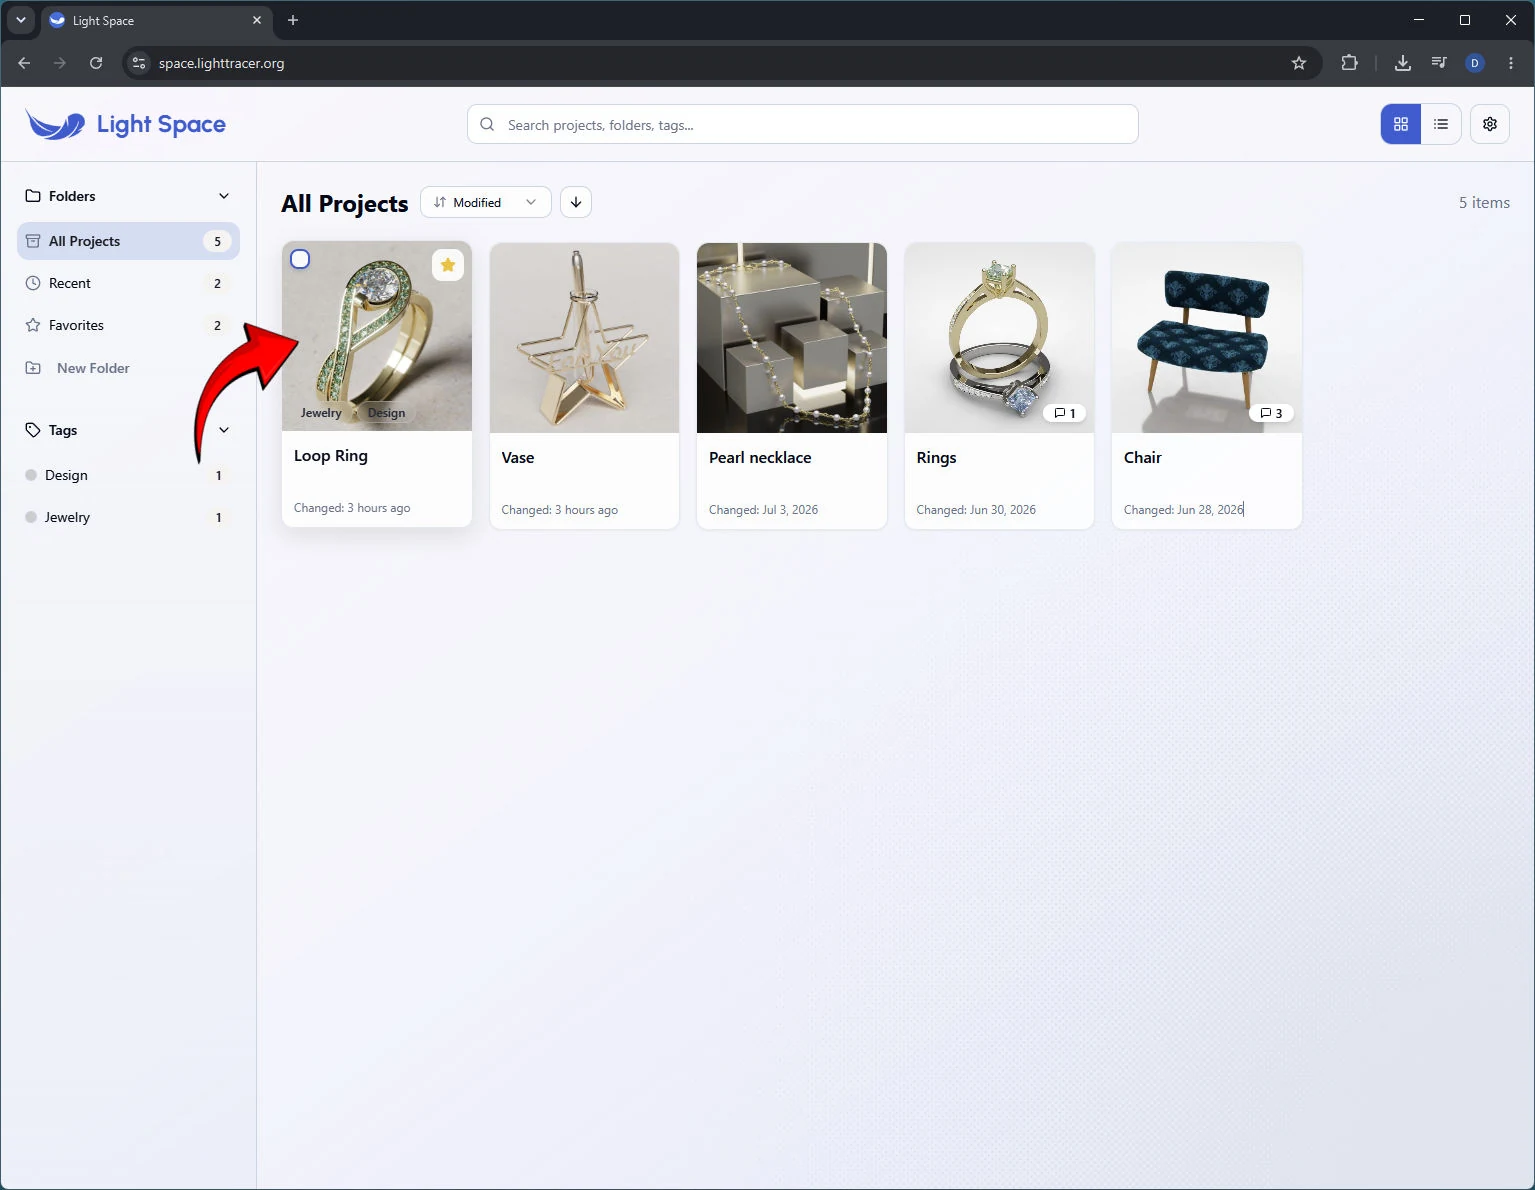
You can effortlessly manage your projects
- Organize projects into catalogs – group your work by client, project type, or stage for a cleaner, more structured workspace.
- Mark projects as Favorites – keep your most important scenes always at your fingertips.
- Search your entire space – quickly find any project by name, folder, or tag.
Together, these tools make navigation effortless – so you can focus on your designs, not on hunting for files.
Project details
Click any project to open the Project details window, featuring the integrated Light Viewer – a full-featured 3D viewer built on the same physically-based engine as the native Light Tracer app. This means you can share and showcase your scenes with the same unrivaled ray-tracing quality, whether you're presenting a jewelry concept or a product prototype.
Once inside, you can freely rotate the camera, inspect every detail, and visualize the scene in real time. All rendering happens locally on your device, eliminating the latency typical of server-based solutions – so feedback is instant and the experience feels truly interactive.
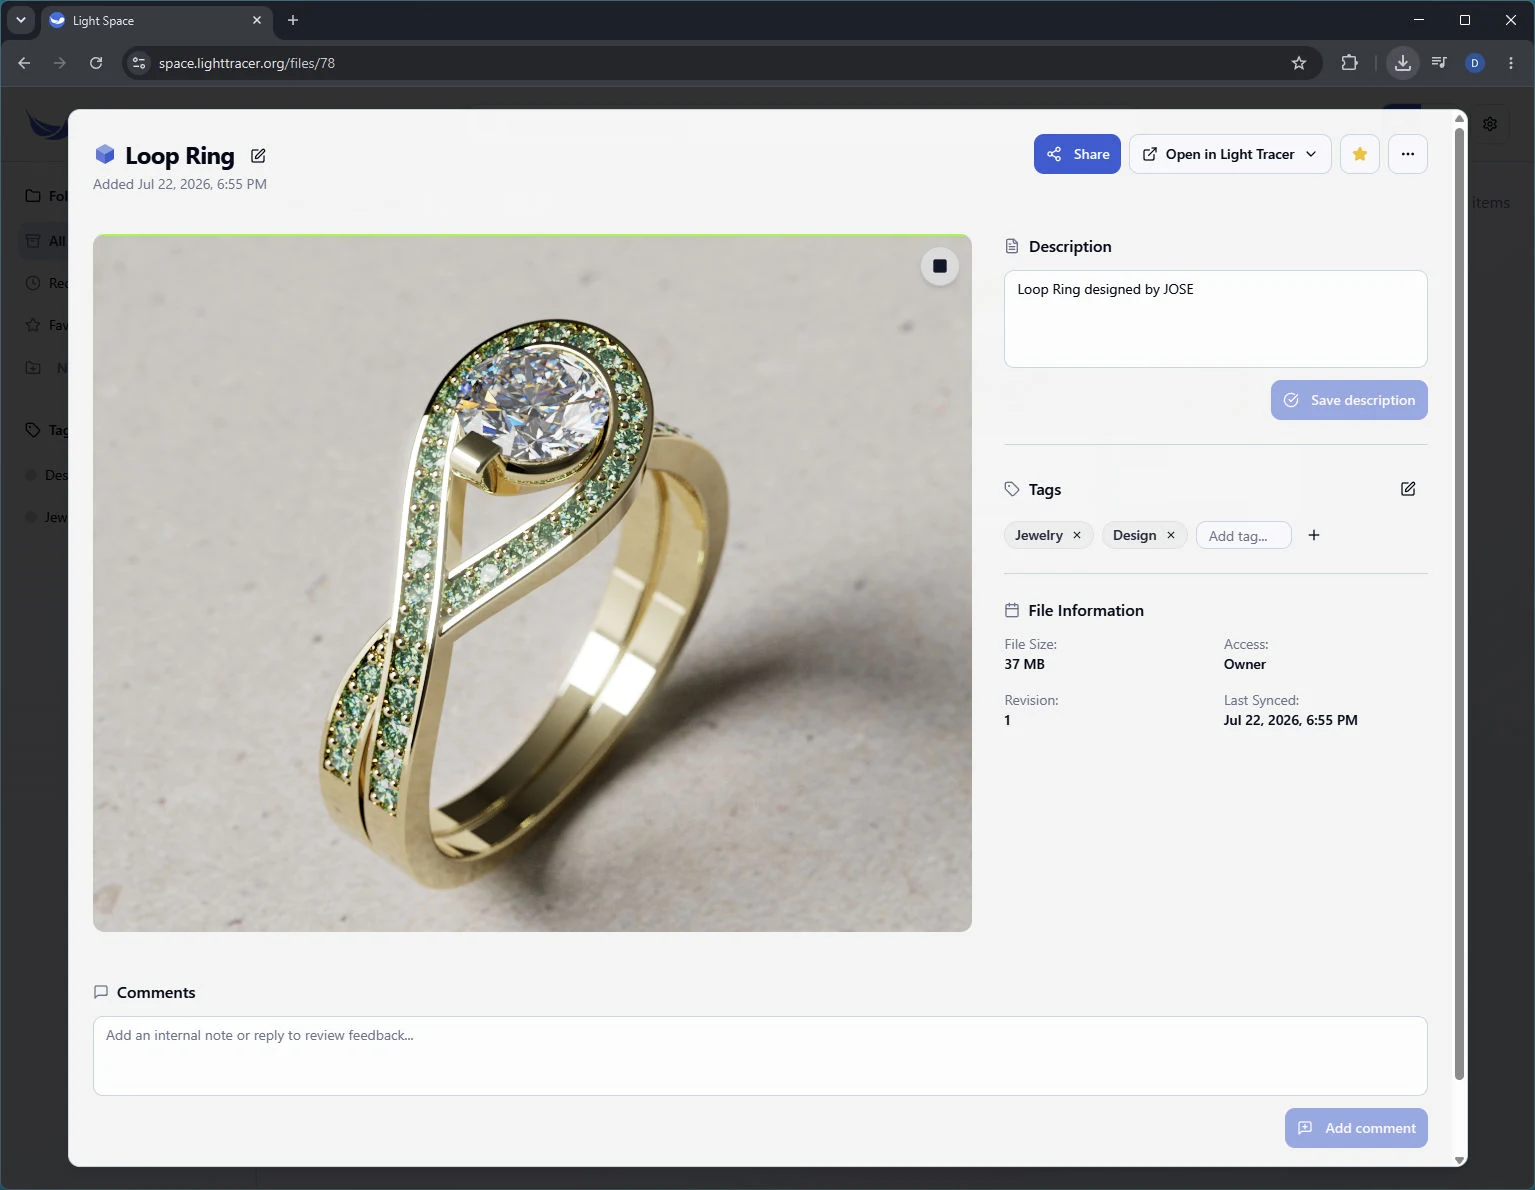
The Project details window also puts essential tools at your fingertips:
- Description & Tags – add context to help collaborators and clients understand your work at a glance.
- Comments – read and reply to feedback directly inside the project, keeping all discussions centralized and easy to track.
Need to make changes? Use the Open in Light Tracer button to open the project for editing:
- Web app – starts editing directly in your browser using the web version of Light Tracer Render. Perfect for quick adjustments on the go.
- Desktop app – launches the native Light Tracer Render app for full-featured editing. The app must be installed and available on your system.
This is especially useful when you start working on your main computer and want to make quick refinements on the go from your laptop – no file transfers, no version confusion.
Sharing
The most important settings live in the Sharing popup, accessible via the dedicated Share button in the Project details window:
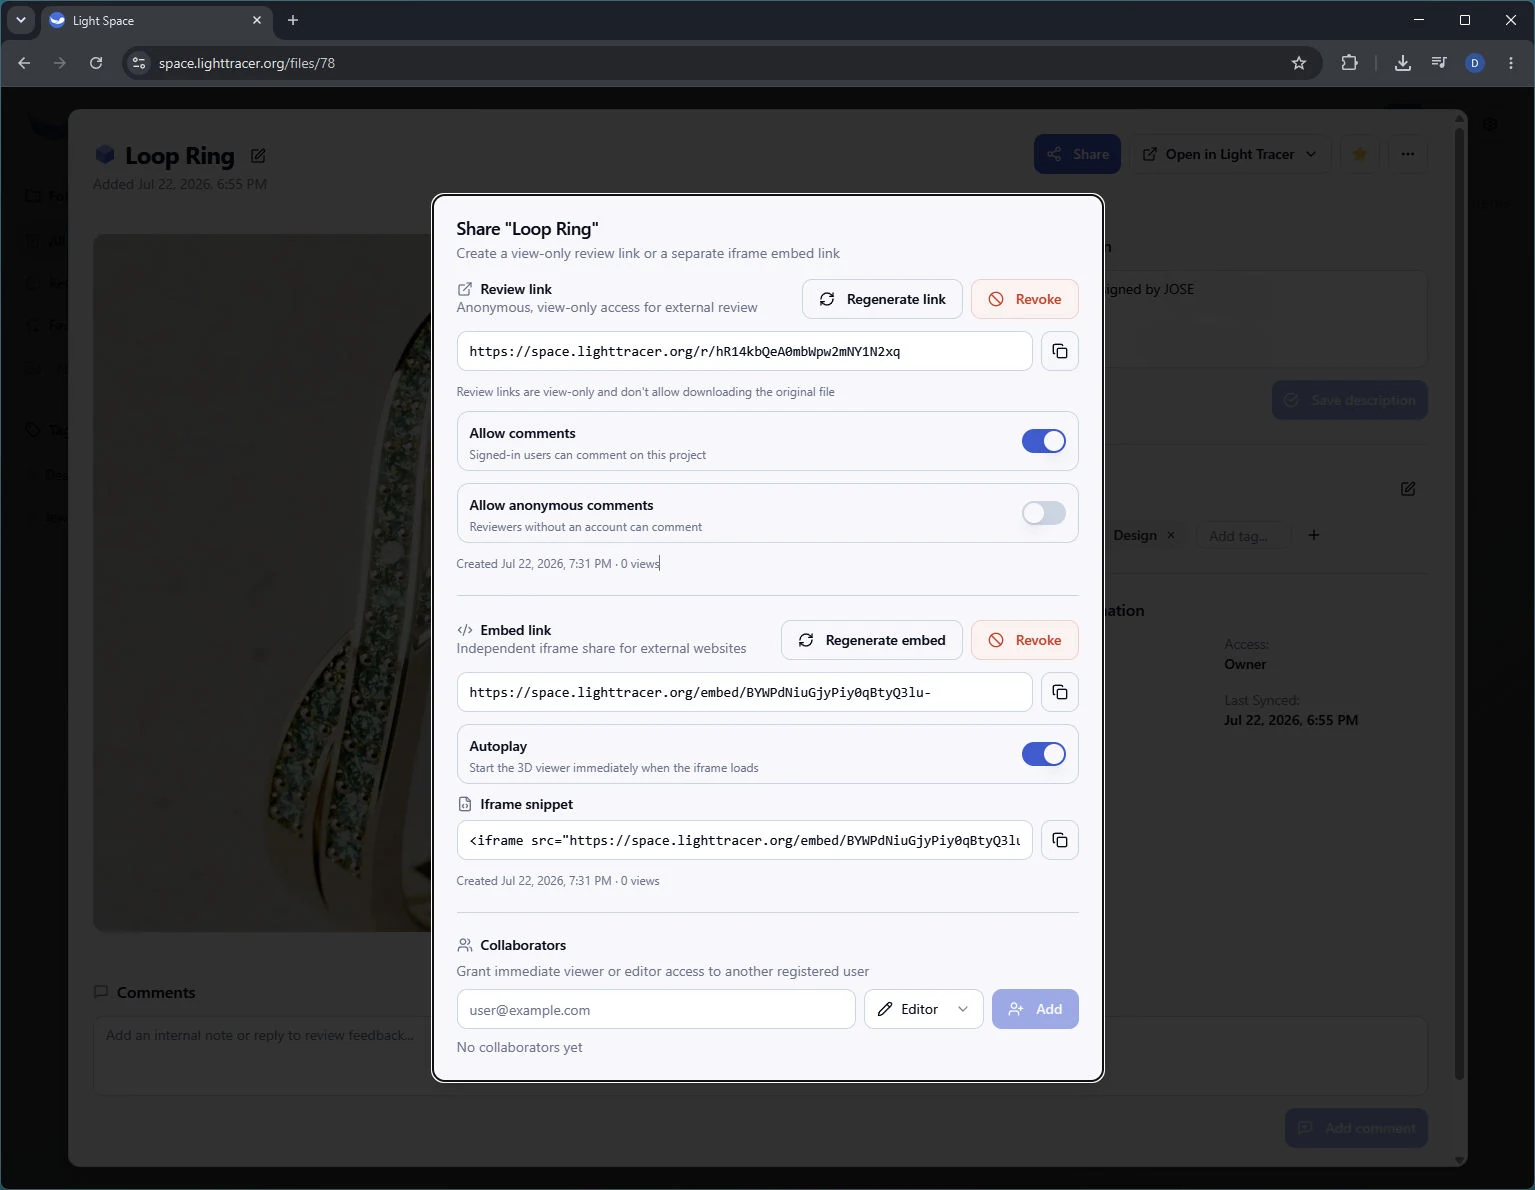
Here you can generate or update a Review link (it's also automatically generated and copied to your clipboard when you click Share in the Uploading popup within the Light Tracer app). Send this link to colleagues or clients to share your work in a secure, view-only format. The model is always encrypted during transmission – so even if the link were intercepted, the data would remain inaccessible.
You can also control who can leave comments: restrict them to registered users only or open them to anyone with the link. This flexibility is especially valuable during client reviews and internal feedback rounds.
You can also generate an Embed link – an iframe snippet that lets you embed Light Viewer with your scene on your own website or landing page. Copy the provided code and paste it into your site's HTML where you want the viewer to appear.
This is useful for online stores, product catalogs, or brand pages where you want to present 3D product visualization directly to your visitors. For more advanced use cases, such as custom configurators, the viewer can be extended further – contact us for details.
Finally, in the Collaborators section, you can invite team members to work on the project with you. Assign each collaborator a role:
- Editor – can make changes and upload updates.
- Viewer – can view and comment, but not edit.
This makes teamwork seamless, whether you're co-designing with colleagues or collecting feedback from stakeholders.
1.4. Project review
When a colleague or client clicks the Review link, they'll see your scene in the Light Viewer, with comments displayed on the right. They can rotate, zoom, and inspect the model freely – all rendering happens locally in their browser:
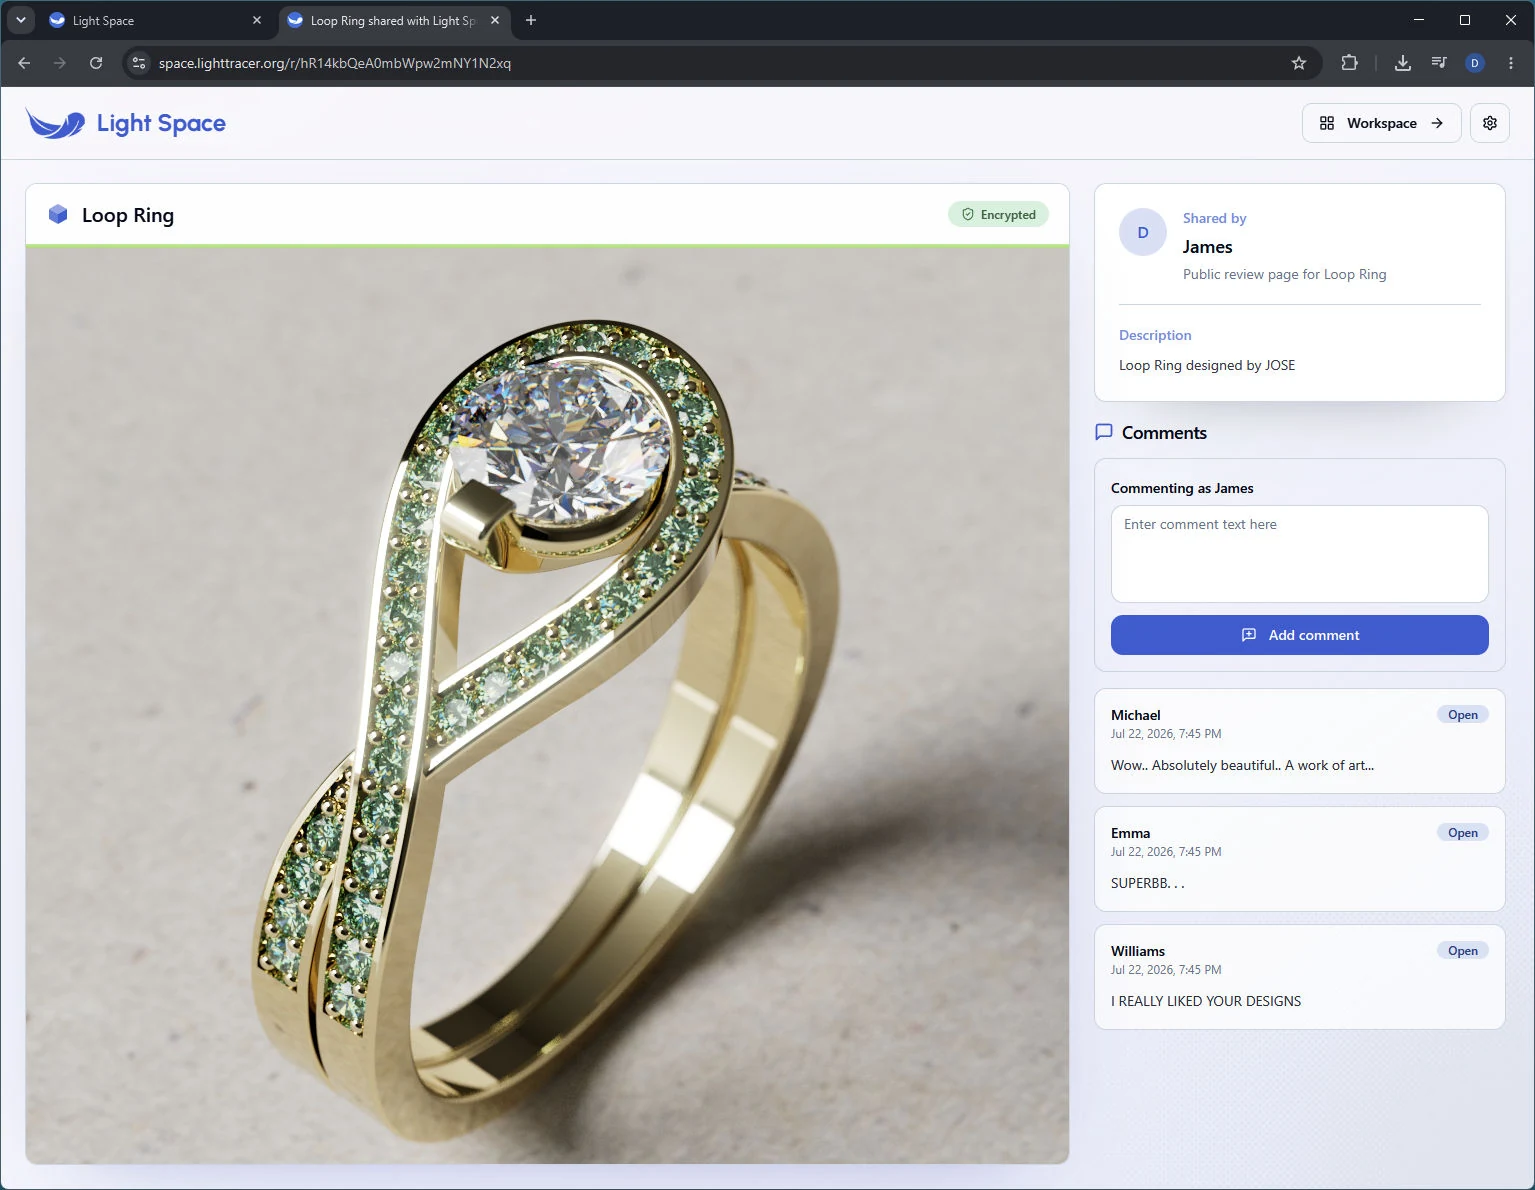
New comments are automatically marked as Open, while comments that have been reviewed and addressed can be marked as Resolved (status can be managed from the Project details). This keeps feedback organized and easy to track.
We're actively expanding Light Space with even more cloud-based functionality and configurator features for the project viewer. Share your use cases with us – your feedback helps us build the tools that matter most to your workflow.
2. Light Tracer Render
2.1. Improved bi-directional/caustic mode
The new version features a revised bi-directional path tracing (Caustic) mode. By tracing light paths from both the camera and light sources simultaneously, this mode efficiently handles complex lighting scenarios – including caustics refracted through transparent materials and hidden emitters that illuminate a scene through small gaps:

To enable it, simply toggle the Bi-directional option in the Settings tab. Enabling this mode may take several seconds while shaders are recompiled:
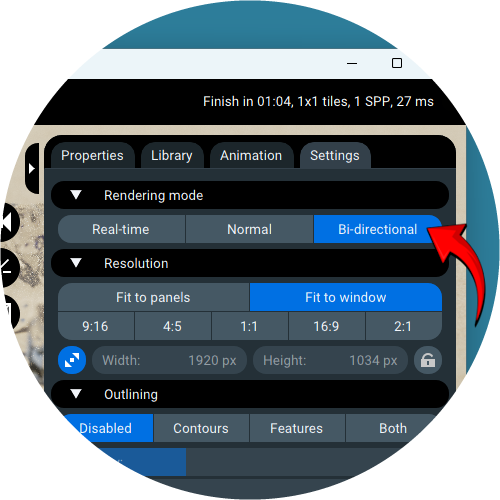
The new version introduces improved sampling mechanisms for light paths. By concentrating most paths on the region of the scene visible to the camera, caustics and other complex lighting effects now converge significantly faster – reducing render times without compromising quality.
2.2. Improved UV unwrapping
The new version features our own UV unwrapping (mesh parameterization) tool, built from the ground up to replace the widely used library. It generates clean, unique texture coordinates for texture painting tasks – cutting the mesh into individual charts and packing them efficiently, all without relying on external dependencies.
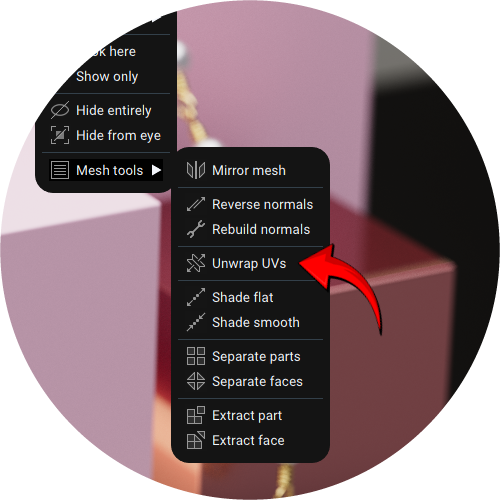
This tool is especially helpful when working with imported geometry that doesn't include UV coordinates – such as STL files – or when the existing UVs don't meet your needs.
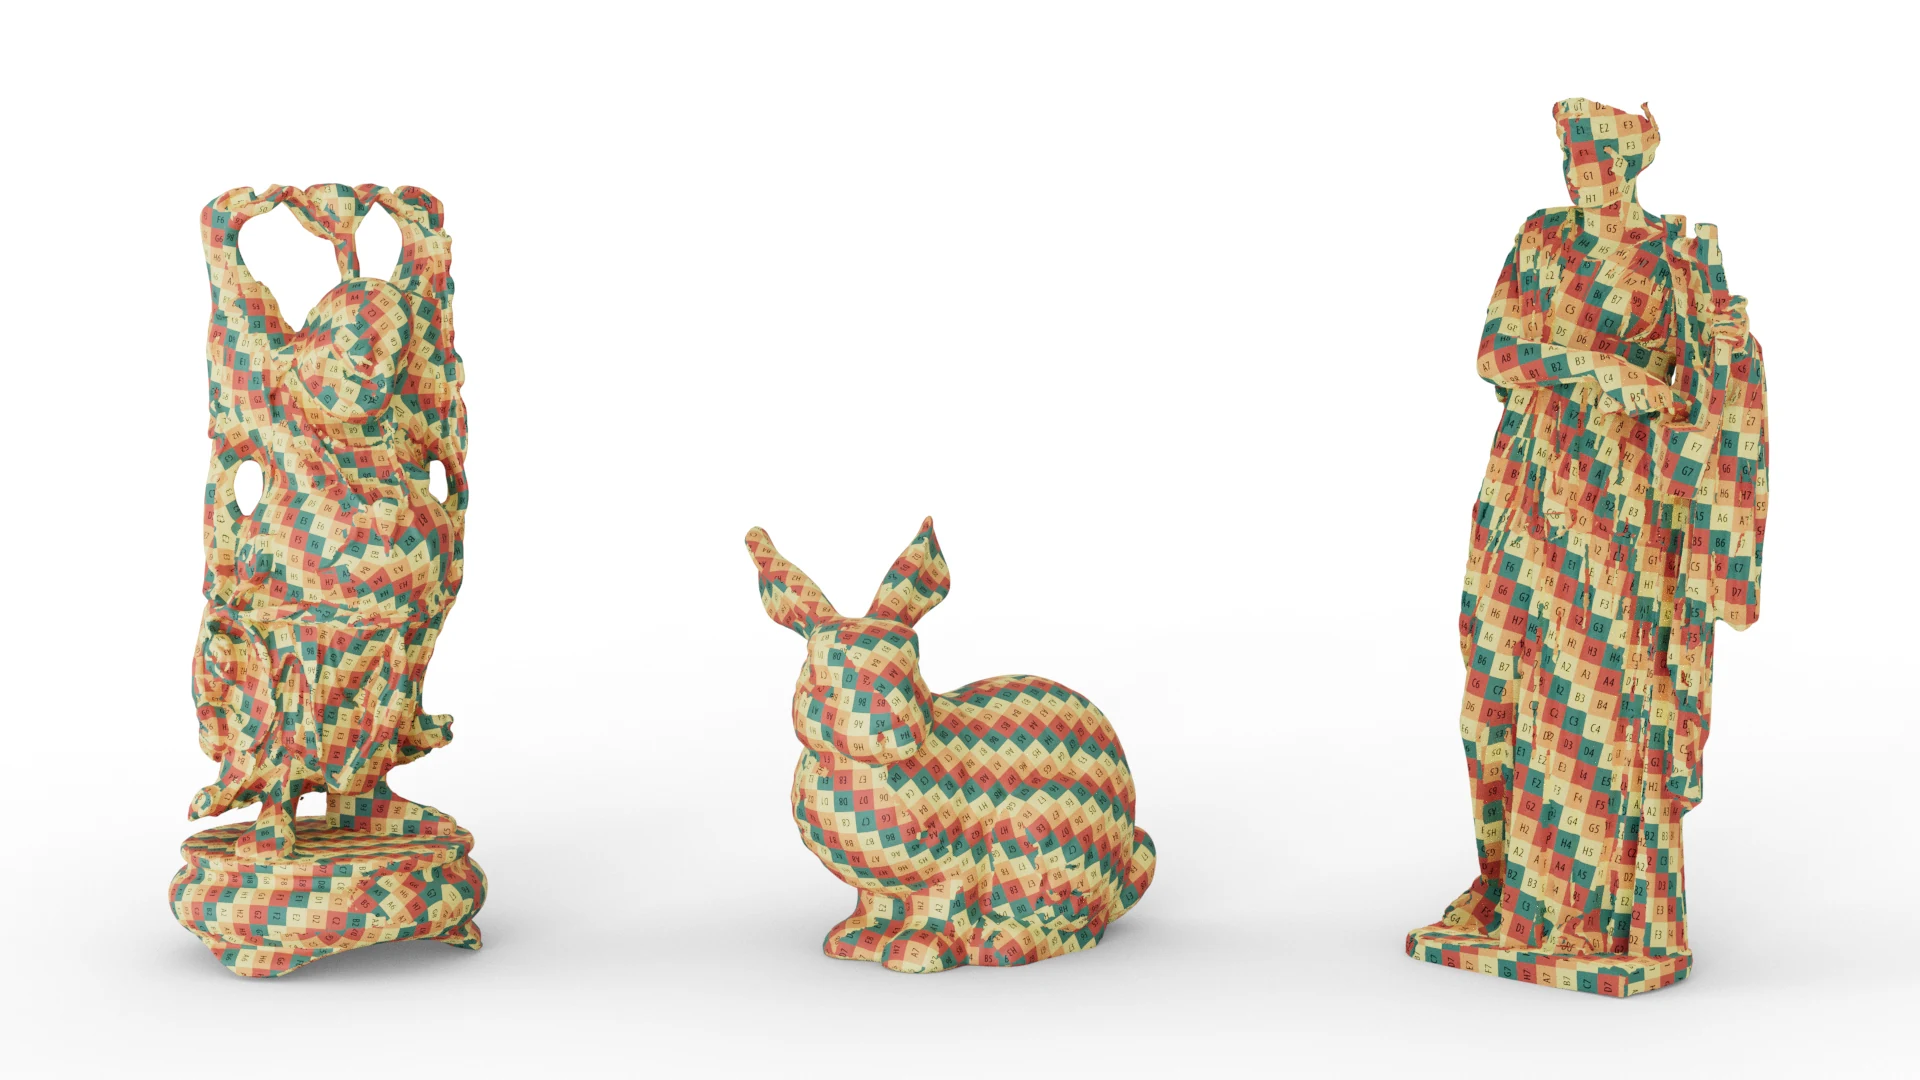
The new state-of-the-art implementation processes large meshes significantly faster and produces noticeably fewer seams than its predecessor – resulting in cleaner texture painting and a more efficient workflow.
2.3. Orthographic camera model
The Camera widget now features an orthographic projection model. Unlike perspective projection, this camera type removes depth distortion – parallel lines stay parallel, and objects keep their true size no matter how far they are from the camera:
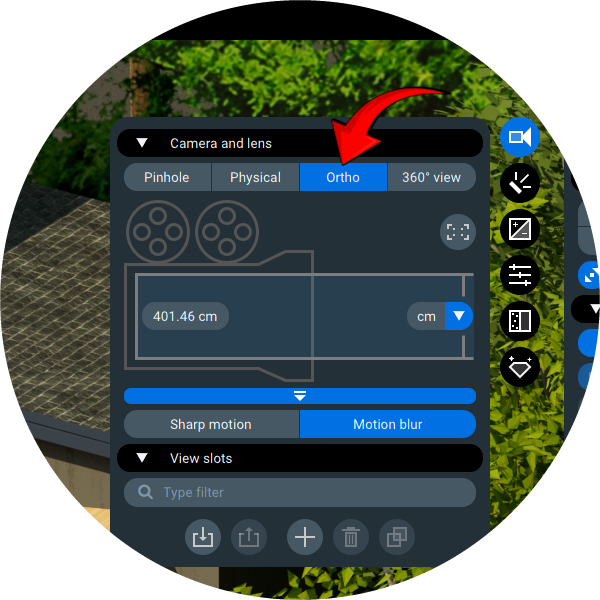
This is especially valuable for architectural visualization, interior design, and any product rendering where precise scale and clean composition matter. Light Tracer supports direct import of SketchUp projects:
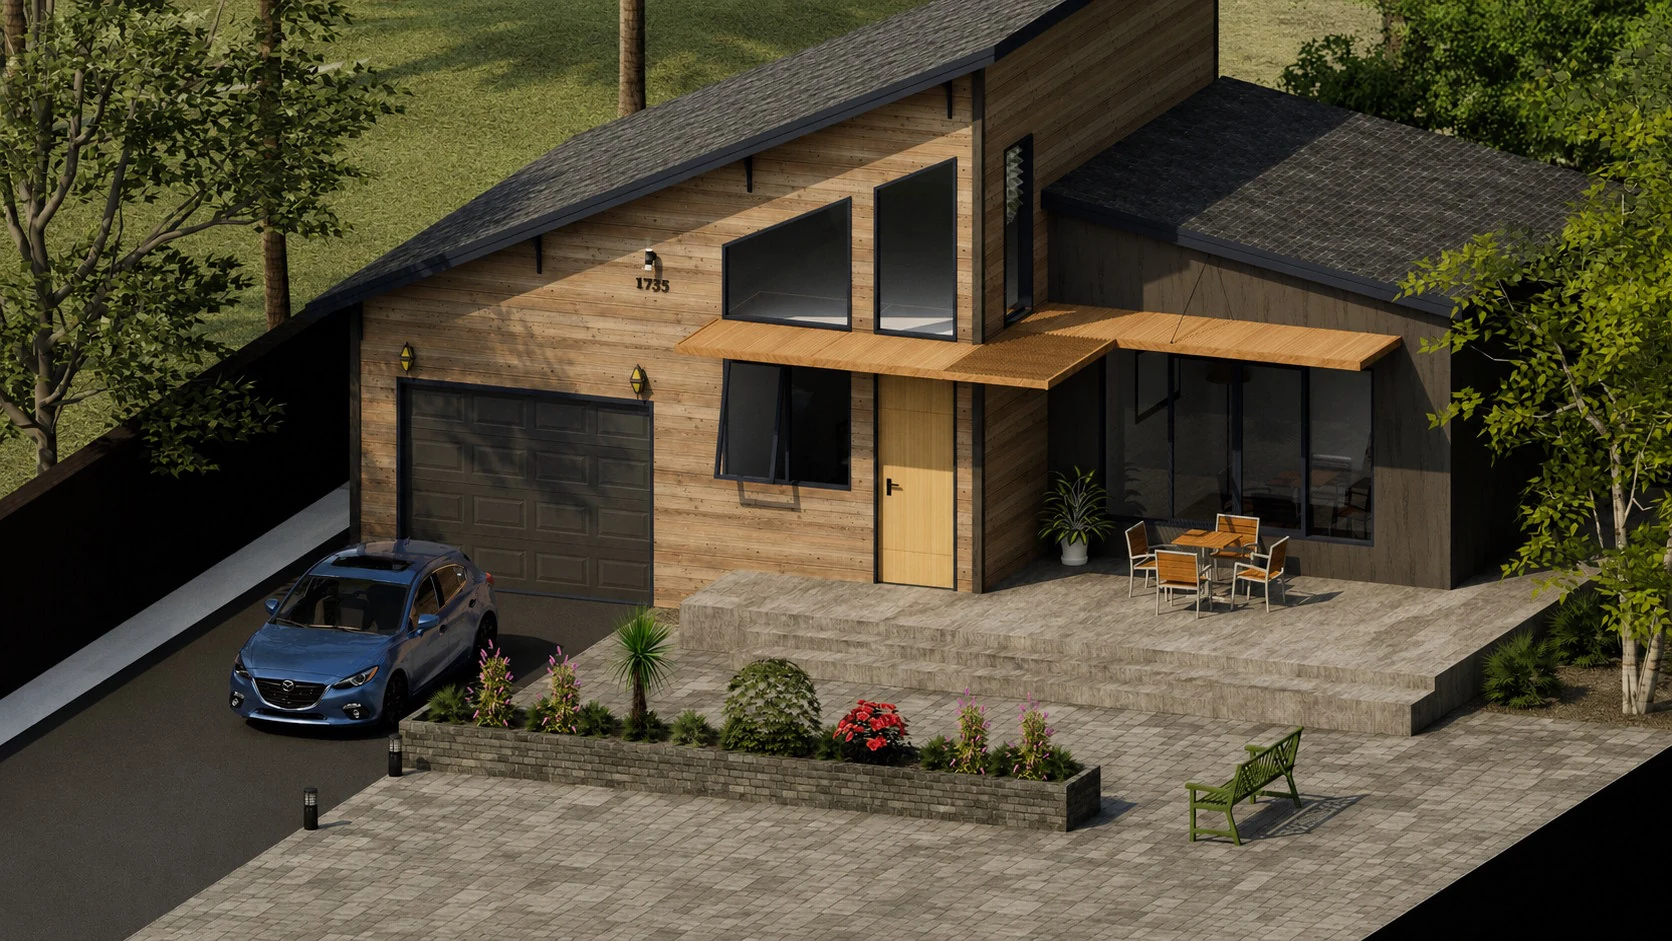
In addition to the orthographic camera, Light Tracer provides other features that make it a natural fit for SketchUp users – a large library of HDRI environments, and an analytical sun and sky model (Environment → Sky), which can also be animated through the Animation widget (just add the Environment track).
2.4. Rhino/3DM tessellation
The new Rhino importer can load 3DM files that don't have embedded tessellation. You can also adjust tessellation parameters to control the accuracy of the imported model – higher values preserve fine details, while lower values reduce polygon count for faster processing. You can also rely on ready-made tessellation quality presets (Low, Normal, High).
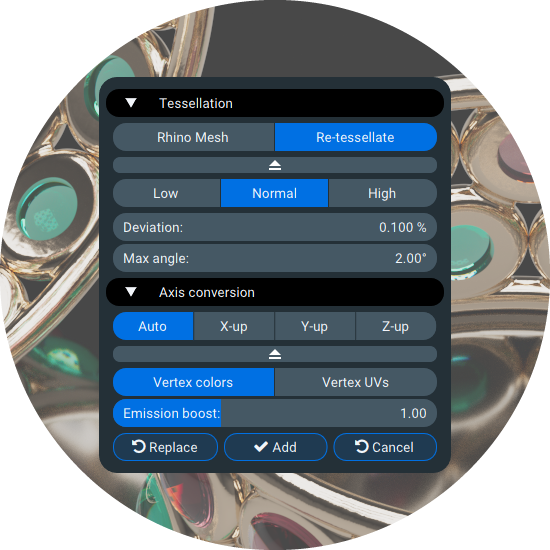
You can override the existing tessellation by enabling the Re-tessellate option – this forces the importer to generate new mesh data regardless of what's stored in the file. If you prefer to preserve the original representation, switch to Rhino Mesh mode, which loads the embedded tessellation (if available).
2.5. New color picker
The latest release introduces a completely redesigned color picker, built around the way 3D designers actually work – every action requires minimal clicks. The interface now shows the parameter name and a large, clear swatch preview, replacing the old RGB input fields:
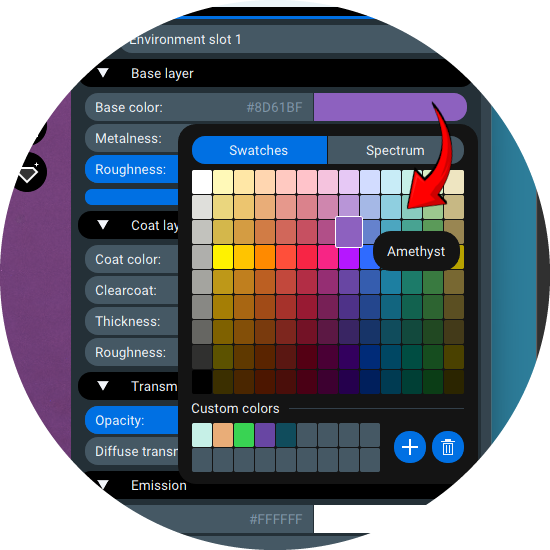
This eliminates any potential ambiguity – it's always clear which parameter you're editing. Click the parameter name to edit the hexadecimal color value directly – copy and paste it for seamless color exchange with other tools.
Click the swatch preview to open the full color choosing popup. It now features two modes: Swatches and Spectrum. Swatches mode displays commonly used Pantone-like colors, organized by hue and brightness for quick selection. You also have access to a customizable palette at the bottom of the popup, which you can fill with your own color presets. Spectrum mode offers the familiar continuous color selection dialog:
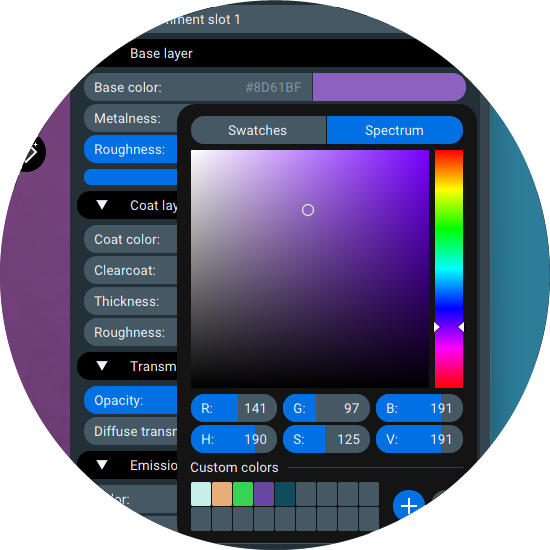
The swatch preview (located right after the parameter name) has another handy feature: hover over it, hold down the mouse button, and drag horizontally or vertically to adjust saturation and brightness. This lets you quickly fine-tune colors without opening the full choosing popup.
2.6. Managing image resolution
The image sizing block, accessible from the Settings tab, has been completely redesigned:
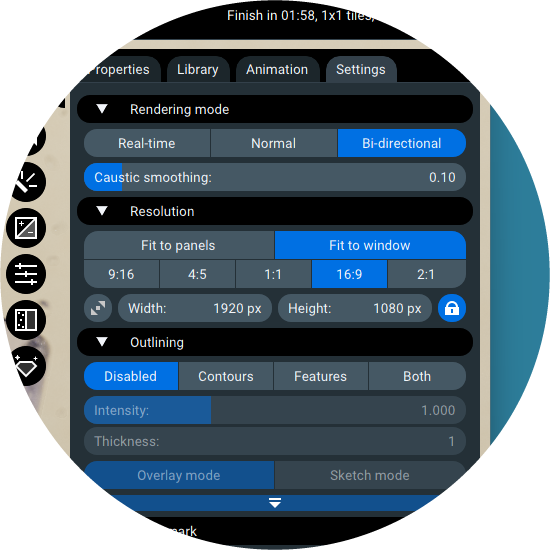
First, you can select from a range of aspect ratio presets (9:16, 4:5, 1:1, 16:9, 2:1). After that, adjust the image size freely – Light Tracer automatically maintains the chosen aspect ratio as you resize.
You can also choose between two display modes for the rendered image: Fit to panels or Fit to window. This setting affects only the image display within the app, not the actual render size. Fit to window uses the full available space, while Fit to panels restricts the image to the area between the side panels, preventing overlap with UI elements. Choose whichever feels more comfortable for your workflow.
Two additional mode buttons are available below the resolution presets. The Fill button ( ) on the left makes the render fill the entire available space – either the full window or the area between the side panels.
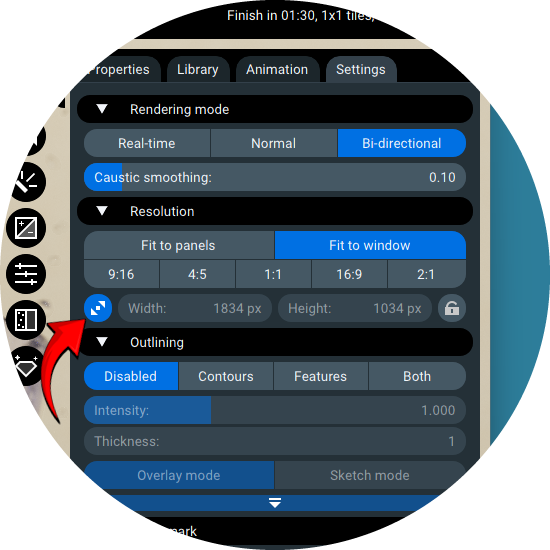
The Lock button ( ) on the right locks the aspect ratio while you resize. This is useful when none of the presets fit your needs and you want to work with a custom aspect ratio that stays consistent.
2.7. Texture auto-reloading
Another new feature is the ability to automatically reload textures from disk. To enable it, open the Settings popup (burger menu, upper-left corner), navigate to the General tab, and toggle the option:
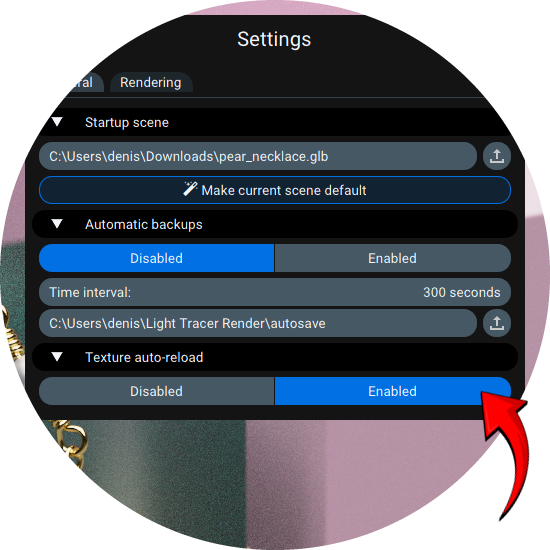
When this feature is enabled, Light Tracer monitors image files assigned to texture slots. If a file is updated – for example, from a graphics editor – Light Tracer automatically reloads it, and the changes appear instantly in the render window. No need to manually re-open textures from disk.
2.8. Enhanced library
The material library has been expanded once again with a wide range of new presets, including a dedicated collection of colored diamonds.
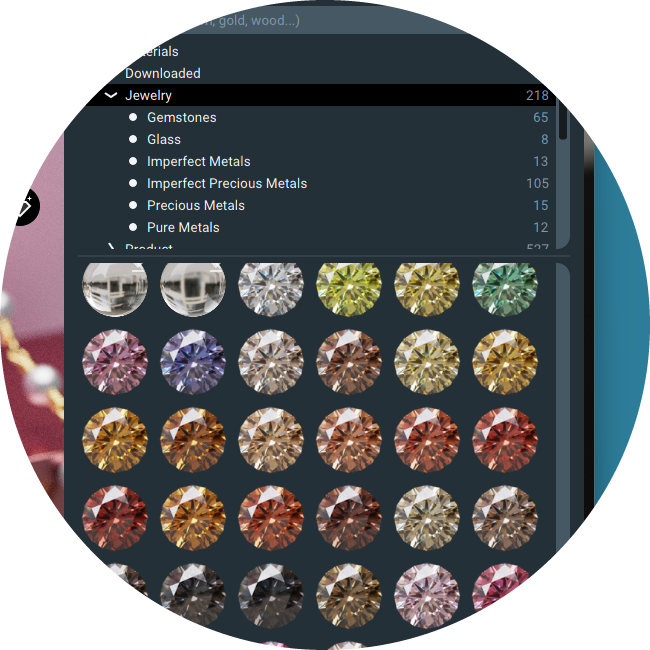
Previews for diamond-type materials have also been updated to feature classic round brilliant cuts, making it easier to evaluate light performance and sparkle at a glance.
2.9. Other improvements
The new version brings a host of smaller improvements – we'll cover the key ones. The Camera widget now lets you enable or disable motion blur explicitly. This effect blurs objects in motion when the camera rotates or moves quickly, mimicking the behavior of real cameras and human perception. The result is more dynamic, cinematic visuals.
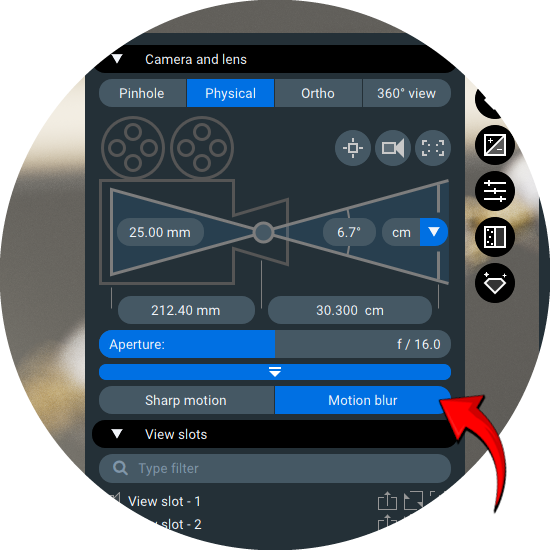
Please note that the current implementation simulates only camera-induced motion blur – the effect caused by rapid camera movement. Motion blur generated by moving objects themselves is not yet supported, though we plan to include it in a future release.
Another new feature is the ability to place an object pivot using the 3D manipulator directly. When rotating or scaling the model, the pivot point remains fixed in space, serving as the geometric center for transforming all other vertices of the object. The pivot point is indicated by a small white sphere:
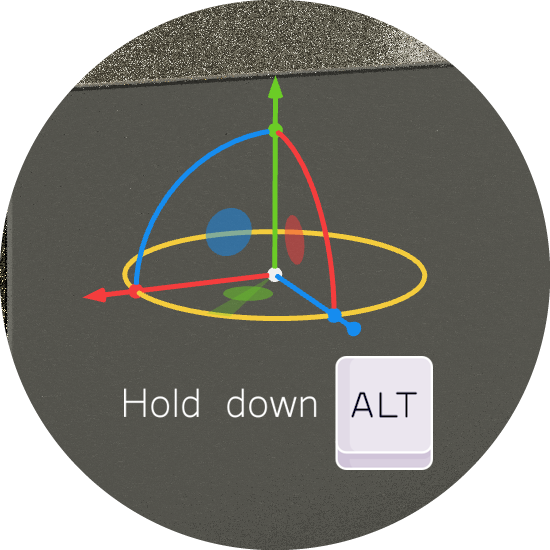
To change its position with the active manipulator, hold down the Alt key – rotation and movement will then apply to the pivot point rather than the object itself. Keep in mind that pivot rotation is only available in the object's local coordinate system. To switch between World and Local space, use the Transform widget or press the Q hotkey.
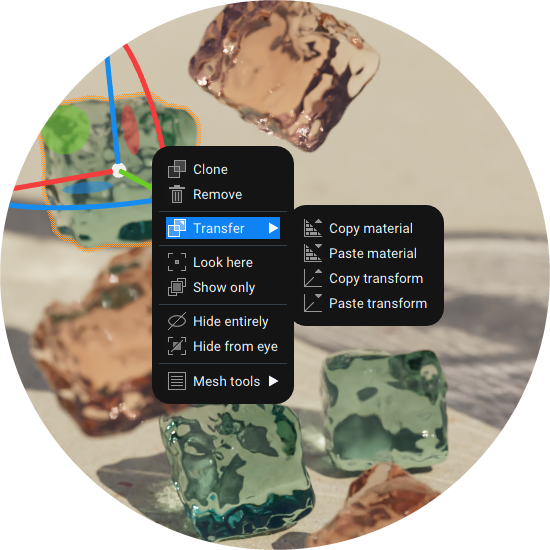
The context menu now features Transfer commands, which let you copy transformation data or material from one object to another. The source object stays intact – this isn't object duplication, but a way to quickly propagate properties between objects.
The context menu in Scene Explorer now offers Group and Ungroup commands for scene tree objects. Group command collects selected objects into a new group, making them easier to manage as a single unit. Ungroup does the reverse – it removes objects from their current group and moves them to the parent leve:
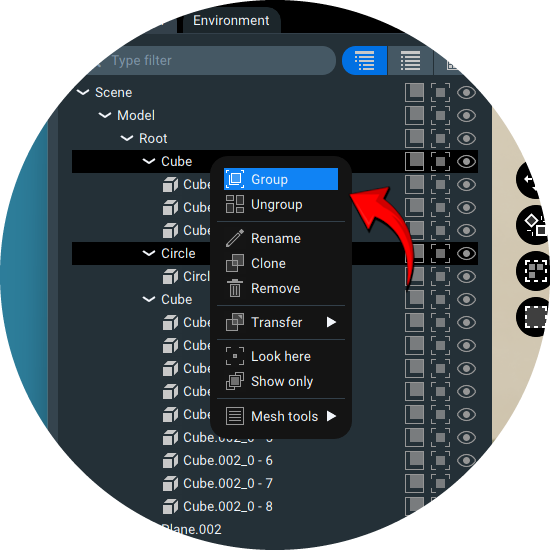
Previously, these operations were also available, but required drag-and-drop in the Scene Explorer. That mechanism is still there – but now you also have a dedicated shortcut.
As with all previous releases, the Undo/Redo subsystem has been improved, covering even more operations. Coverage is now nearly complete – you can work with confidence, knowing that accidental changes are easily reversible.
Finally, we've introduced a new Exit popup that shows a summary of unsaved changes before you close the application. This helps prevent accidental data loss:
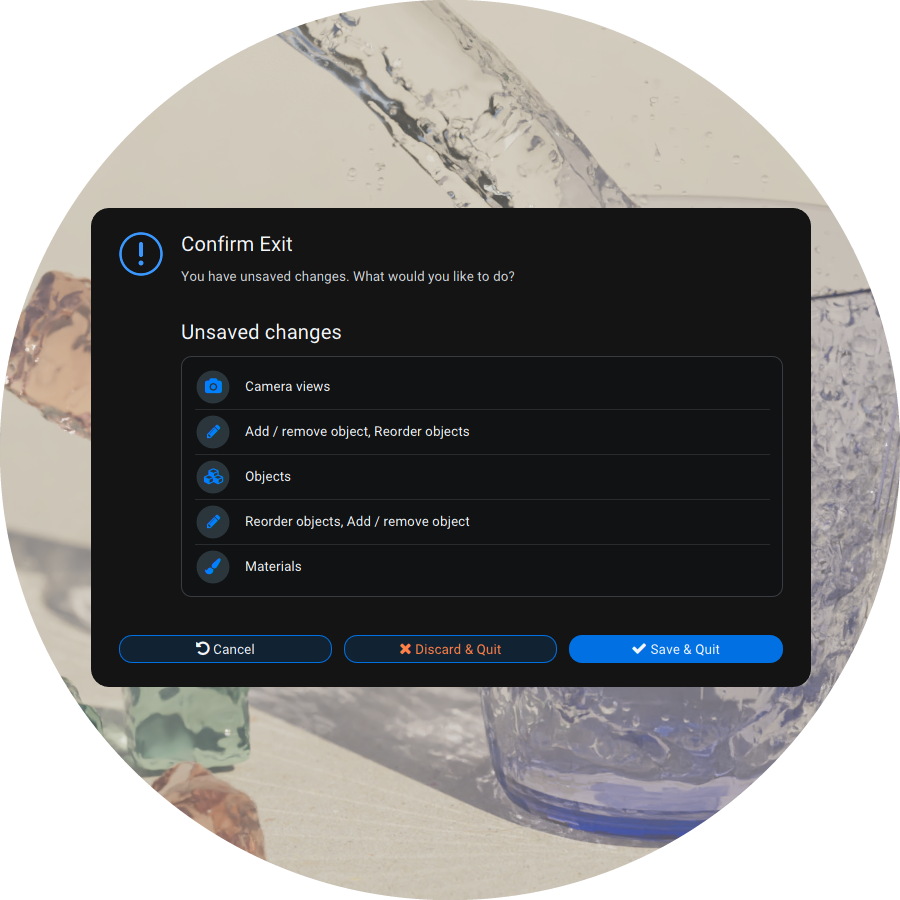
The popup lets you review your changes at a glance and decide whether to save, go back to editing, or discard them.
We hope these new features make your time in Light Tracer Render smoother, more enjoyable, and more productive than ever before. As always, we're grateful for your feedback – it continues to shape the future of our software.